

 11/21/2026
 Steve Bearden
A clean print edge is planned beyond the finished page. Bleed is extra artwork that extends past the trim line, while crop marks show where the printed sheet should be cut. This guide explains bleed and trim marks as separate production controls that work together to help prevent unwanted white slivers at the edge.
It’s easy to assume that adding crop marks or selecting a bleed setting is enough. The artwork itself must extend into the bleed area if color or imagery should reach the edge. An intentional white margin, by contrast, can often be printed without bleed. This guide explains what each mark does, when a white border changes the setup, and how to prepare a file if your design software can’t add bleed. You’ll also see why essential text and logos need to stay safely inside the trim. The result is a clearer handoff from design to production, with artwork prepared for the finished size.
Key Takeaways
- If the design has intentional white margins and no edge-to-edge artwork, it can often be printed without bleed.
- Crop marks indicate where to cut; they don’t extend the artwork or create bleed.
- Keep essential text and logos inside the safe area, and extend edge-to-edge backgrounds beyond the trim.
- If your software can’t add bleed, prepare the artwork beyond the finished dimensions and make sure the exported file reflects the intended trim size.
Can I print without bleed if my design has a white border?
Yes. A design with an intentional white border can print without bleed when no color, image, or other artwork should reach the paper edge. The trim line defines the finished format. Without bleed, unprinted paper remains outside that line and forms the border. This works when the white margin is part of the design, not an unintended gap.
Cutting can shift slightly, so a narrow border may look uneven if the trim varies. Bleed reduces the risk of a thin white edge when background artwork reaches the cut. It doesn’t change the finished size. The extra image or color outside the trim line is cut away during production.
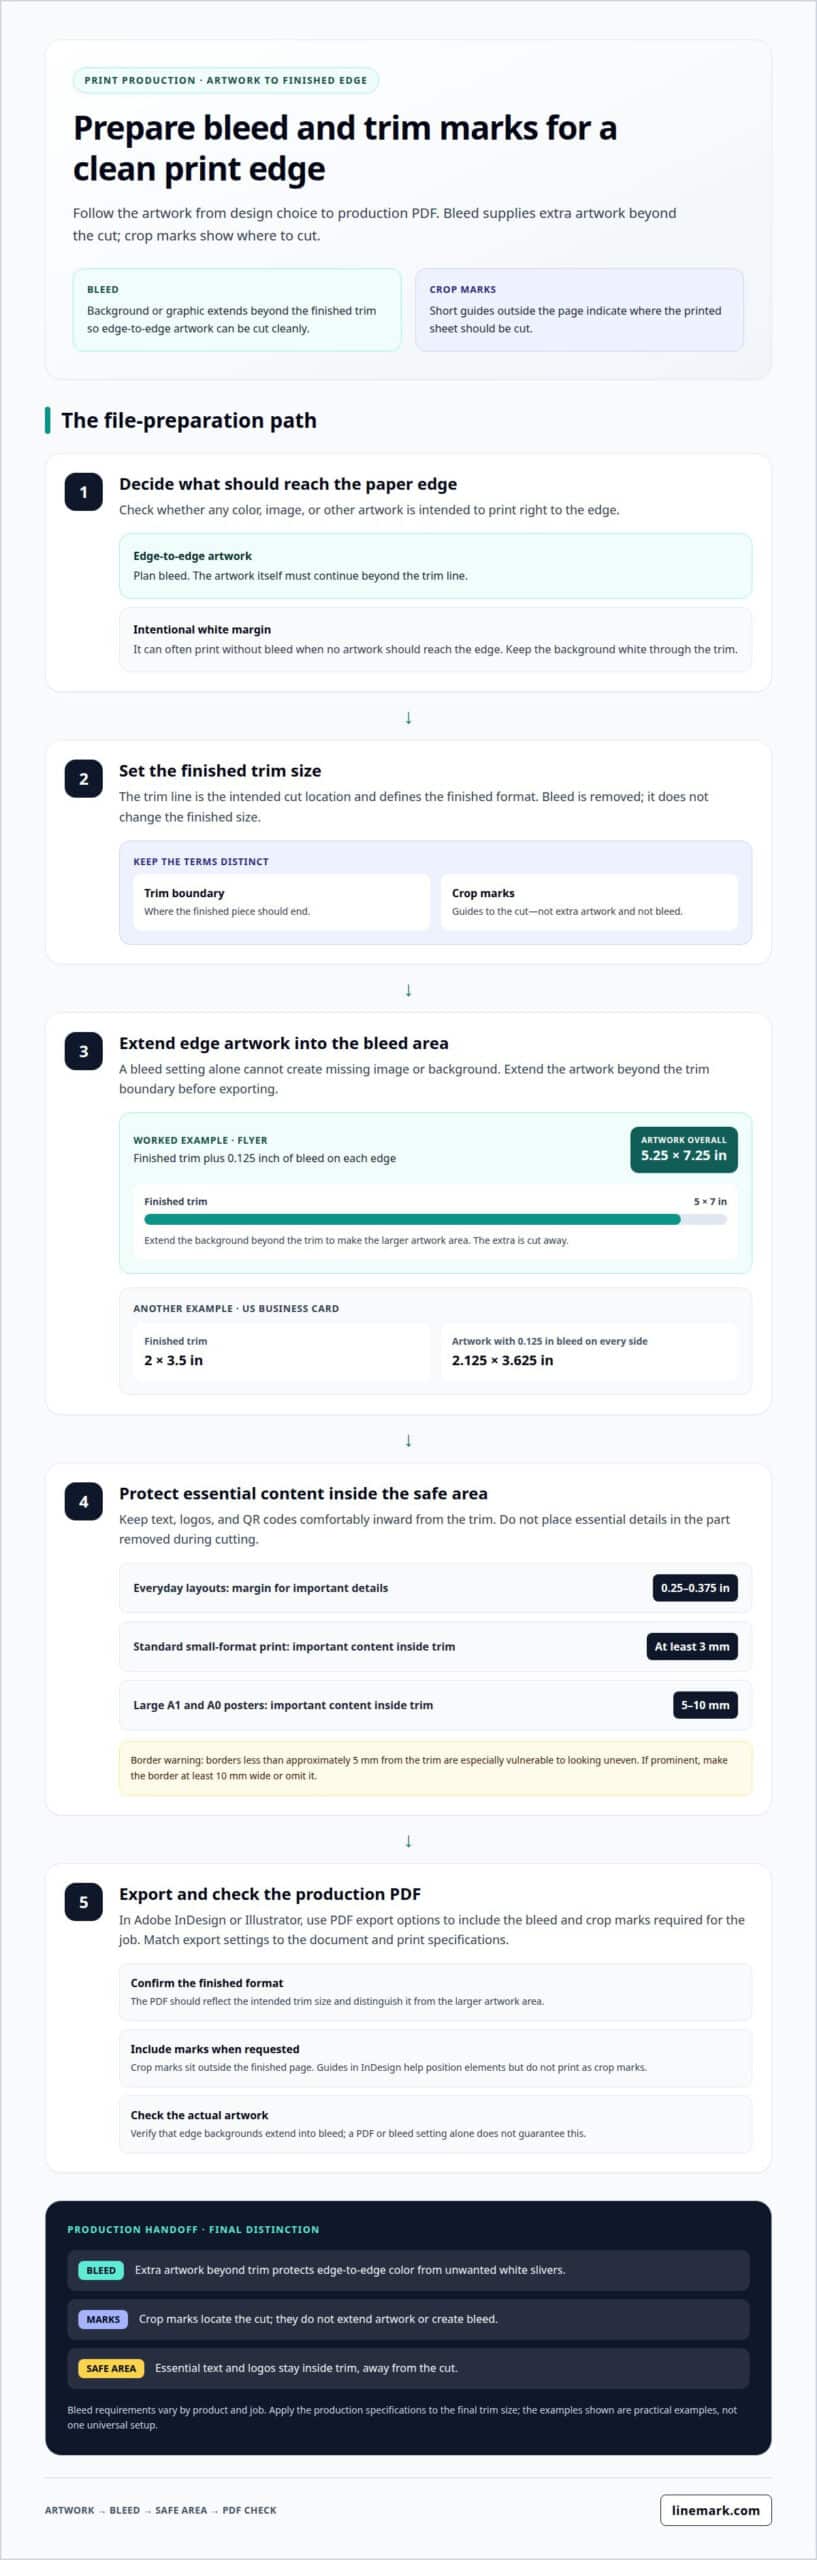
Keep essential elements inside the safe area, not directly beside the trim line. Place text, logos, and QR codes far enough inward that slight cutting movement won’t remove or crowd them. Keep essential elements comfortably inside the safe area to reduce the chance that cutting will remove or crowd them. For everyday layouts, a 0.25 to 0.375 inch margin gives important details more room.
Use the intended format to decide where each element belongs. A border close to the edge can appear uneven after cutting; borders less than approximately 5 mm from the trim are especially vulnerable. If the design needs a prominent border, make it at least 10 mm wide or omit it.
- For a white-margin flyer, keep the background white through the trim line and position the headline and contact details inside the safe area.
- For a full-bleed image, extend the image beyond the trim line; a bleed setting alone won’t extend the artwork.
- For an edge-framed layout, move the frame inward or widen it to reduce the appearance of uneven cutting.
These measurements serve different purposes: bleed protects edge-to-edge artwork, while the safe area protects important content. Required allowances can differ by format and job, so apply the production specifications to the final trim size.
Adding crop marks and guidelines in design software
Bleed is artwork outside the finished format, while crop marks indicate where cutting should occur. In Adobe software, set the document’s bleed and export marks to match the print job’s requirements.
Exporting PDFs with Bleed and Crop Marks
A print PDF carries the page artwork and, when selected, its bleed and crop marks into the production file. Export settings matter because a PDF saved without them may have the wrong finished size or proportions. In Adobe InDesign or Illustrator, use the PDF export options to include the required bleed and marks. Match the settings to the document and the print specifications.
For example, a 5-by-7-inch flyer with 0.125 inch of bleed on each edge has artwork extending to 5.25 by 7.25 inches overall. The bleed setting alone won’t add that extra image area. Extend the background beyond the trim boundary, then export the PDF with the applicable bleed settings. Crop marks sit outside the finished page, so they don’t become part of its printed border.
Crop Marks and Trim Boundaries
Crop marks, also called trim marks, are short lines outside the page that guide the cut at the trim boundary. They identify where the finished piece should end. The trim boundary is the intended cut location; the marks are visual guides to it. They’re different from artwork bleed, which extends beyond that boundary.
In a layout with a full-color border, the background must extend past the trim boundary so slight cutting movement won’t expose unprinted paper. Keep text and logos inside the safe area, away from the marks. In Adobe InDesign, document guides can help position those elements, but guides don’t print as crop marks. Export crop marks only when the job requires them, and confirm the PDF has the correct finished format and bleed.
What are crop marks?
Crop marks are short guides showing where a printed sheet should be cut. Bleed is extra background or graphic beyond the finished trim, providing material to cut through when artwork reaches an edge. A guide titled “Bleed and trim marks explained” can help teams distinguish the file’s artwork from its cut indicators.
That distinction matters in production: crop marks locate the cut, while bleed helps preserve edge-to-edge color after cutting. A common bleed allowance is 3 mm, but the required amount depends on the product and job. A bleed line is commonly placed 0.125 inches beyond the trim line. The printed graphic must actually extend into this bleed area; a document setting alone cannot supply missing background artwork.
For a US business card, the finished trim is 2 by 3.5 inches. With 0.125 inch of bleed on every side, the artwork size is 2.125 by 3.625 inches. The portion outside the trim is removed, leaving the intended format. Keep text and logos inside the trim and safe area rather than placing them in the part removed during cutting.
Poster and small-format requirements can differ. For large A1 and A0 posters, 5 mm of bleed is recommended as a safer allowance, with important content 5 to 10 mm inside the trim. Standard small-format print commonly keeps important content at least 3 mm inside the trim. These are practical examples, not one universal setup for every format.
Before sending a file, identify the finished dimensions and whether any color or image should print to the edge. Include crop marks when requested, and prepare the PDF with the specified bleed. A PDF isn’t automatically print-ready just because it’s a PDF. Clear file details distinguish the finished size from the larger artwork canvas and show which background should extend beyond the cut. A note headed “bleed and trim marks explained” can clarify those details for the production handoff.
- For edge-to-edge artwork, extend the background through the bleed area.
- For a white margin, keep the background white at the trim.
- Keep essential details inside the safe area, not in the portion outside the trim.
Artwork requirements when a design application cannot add bleed
If your design application has no bleed control, build the extra area into the artwork dimensions. For edge-to-edge printing, extend the background beyond the intended trim on every side. A common bleed allowance is 0.125 inches per edge, adding 0.25 inches to each overall dimension. Keep the finished trim dimensions clear when naming or describing the file.
For example, a 4-by-6-inch design with that allowance needs a 4.25-by-6.25-inch canvas. Continue background colors and images into the added margin, but keep text and logos inside the finished area. If the canvas cannot extend beyond the trim, the artwork may not include the extra area needed for bleed. A PDF saved from that file won’t gain bleed automatically.
Before exporting, distinguish nonprinting guides from drawn artwork. Guides may help position the trim boundary, but manually drawn lines can appear in the exported file. Hide or remove guide layers, then open the PDF and inspect its edges. Check that the background reaches the canvas edge and that no temporary border or guide remains visible.
- Confirm the finished dimensions and the larger canvas dimensions are both clear.
- Inspect every edge for gaps in the background that could become a white edge after cutting.
- Keep important artwork inside the trim, and make sure added space contains background only.
- Export a PDF, then review its page size, artwork edges, and visible marks before sending.
Common mistakes include enlarging the page without extending the background, stretching the entire design and changing its proportions, or leaving a guide line in the exported artwork. Crop marks don’t replace bleed. If you add marks manually, keep them outside the finished artwork and follow the print file requirements.
For a print project that needs precise file preparation, work with Linemark on Commercial Printing.
Linemark
Linemark supports print projects from prepared artwork through production, including work where trim and bleed requirements need to align with the finished piece. Its commercial printing capabilities cover projects such as direct mail, custom books, and large-format graphics. Clear trim dimensions, artwork, and file requirements help establish a practical production handoff.
Turn to Linemark when a print project needs coordinated production and you want to clarify how the supplied file fits the intended format. If software limitations make bleed setup difficult, sharing the artwork and finished dimensions can help frame the production discussion.
Contact Linemark to discuss your print project and artwork requirements.
Prepare your next file for production
With bleed and trim marks explained, you can make the file handoff part of the project plan, not a last-minute adjustment. Decide how the finished piece should look at its edges, then align the artwork, document size, and export settings with that result. A clear production brief helps preserve design intent as the file moves from layout to print.
For a project that spans formats or needs a production partner, Linemark supports work including Custom Book Printing, Direct Mail, and Large Format Graphics. Share the intended finished size, whether artwork reaches the edge, and any file constraints. Those details give the production conversation a useful starting point.
Contact Linemark about your print setup to discuss your project and next steps. A well-prepared file puts your design on a clearer path to a polished finished piece.
Frequently Asked Questions
What is a bleed?
Bleed is the part of a printed design that extends beyond its intended finished edge and is removed during trimming. For example, a full-color photograph running to a brochure’s edge needs image area beyond that edge. This gives the cutter room to trim without leaving an unintended strip of unprinted paper. A white-margin layout doesn’t need that extra image area where no artwork reaches the edge.
What is a trim line?
The trim line marks the intended boundary of the finished printed piece. It separates the area that remains from the surrounding material that will be cut away. For a postcard, the trim line defines the final postcard dimensions, not the larger sheet or artwork canvas. Keep fine borders and small type away from this boundary, since slight cutting variation can make edge spacing look inconsistent.
Do cut marks or colour codes need to be included in the print template?
Include crop or cut marks only when the print specifications request them; they aren’t necessary in every template. Don’t add color codes or other production labels as visible artwork unless the file instructions call for them. For example, a PDF made from a template shouldn’t show registration notes across the printed design. Keep guides nonprinting and follow the requirements for the specific job.
What are the standard measurements for print guidelines?
There isn’t one measurement for every format and job. A common bleed allowance is 0.125 inches beyond the trim on each side. A safety line at least 0.125 inches from the document edge is one reference, while a 0.25 to 0.375 inch safety margin offers more room for key details. Larger finished pieces may need larger safe margins.
What dimensions should I create for a design with bleed?
Add the bleed allowance to both sides of each dimension. For a US business card trimmed to 2 by 3.5 inches, the listed artwork size with bleed is 2.125 by 3.625 inches. That adds 0.125 inch at each edge. Keep the background or image within the added area, while placing names and contact details within the finished card.
What do trim marks and safe areas show?
Trim marks identify the intended cut positions around a printed piece. The safe area is an inset region for content that must remain readable and intact after trimming. For example, keep a QR code or phone number inside that region rather than close to a cut mark. The marks guide production; the safe area helps protect important content from being clipped or crowded.