

 10/02/2026
  Steve Bearden
What if the biggest floor-graphics decision happens before the artwork is finalized? Successful custom floor graphics printing starts with the space: its surface, traffic, campaign purpose, and installation requirements. Get those details right, and the graphics can support wayfinding, promotion, or a broader brand experience with a clear plan for production and installation.
Materials, finishes, legibility, and performance all depend on where a graphic will go and what it needs to accomplish. Define the floor conditions, quantity, and installation plan alongside the artwork so each decision supports the finished project.
This guide explains how to assess the environment, set project specifications, prepare artwork, and coordinate production and installation. Linemark brings more than 30 years of experience, large-format production, and professional on-site installation to print projects. Use the steps below to plan floor graphics around your campaign and operational needs.
Key Takeaways
- Match floor graphics to their purpose, whether guiding visitors, promoting a campaign, or supporting on-site communication.
- For custom floor graphics printing, assess the floor surface, traffic, campaign duration, and maintenance needs before selecting materials and finishes.
- Compare options by project fit, including artwork, quantity, floor conditions, and installation requirements, rather than by one feature alone.
- Prepare accurate dimensions, review proofs, and coordinate site readiness and installation to reduce production surprises.
- Plan floor graphics as part of a broader large-format program, with Linemark coordinating production and professional on-site installation for business projects.
What Is Custom Floor Graphics Printing, and Where Does It Work?
Custom floor graphics printing turns a floor into a communication surface. Unlike a poster or wall sign, a floor graphic places directions, offers, or visual cues in the path people already take through a space. It might provide a focused prompt, such as an arrow toward registration, or contribute to a larger visual environment. The idea connects with Supergraphics, which explores how large-scale graphics can shape the perception of a space.
Floor graphics are one part of a signage system, not a replacement for every sign. They can prompt an action as people move through a space, while wall signs, banners, and other formats can be easier to see from a distance or carry more detailed information. Start with the communication goal, then decide whether a floor-level message will be easy to notice and follow in its intended location.
Which business goals can floor graphics support?
Match the message to a clear audience action. Directional graphics can help visitors find a department, entrance, queue, or event area. A concise arrow or destination label can reduce uncertainty at a decision point.
For a retail promotion, a graphic near a featured display can draw attention to a product area or offer and encourage shoppers to explore it. At a conference or branded interior, a logo, pattern, or campaign visual can reinforce the event environment and help attendees recognize key zones. Operational messages can also show where to line up or which path to use. In each case, placement and message should serve a specific purpose rather than add decoration without direction.
What should teams assess about the installation environment?
Start with the actual site. Record the floor surface and condition, the precise location, expected foot traffic, and routine cleaning methods. These details affect material selection and expected performance. A smooth, clean interior floor presents different conditions from a textured surface or an area exposed to moisture, grit, or frequent cleaning. Don’t assume one material or adhesive will suit every floor.
- Surface: Identify the floor material, texture, seams, and condition where the graphic will sit.
- Location and traffic: Note whether people walk directly over it, turn nearby, or move equipment through the area.
- Exposure and maintenance: Distinguish indoor conditions from outdoor exposure, and document cleaning products and frequency.
Outdoor placement brings exposure to weather and changing ground conditions, so specifications must suit that setting rather than rely on indoor assumptions. In public-facing locations, consider visibility and safe movement alongside the message. Matching the graphic to the floor and operating conditions helps teams set realistic expectations before artwork and production decisions are made.
How Do Materials, Finishes, and Floor Conditions Affect Printed Graphics?
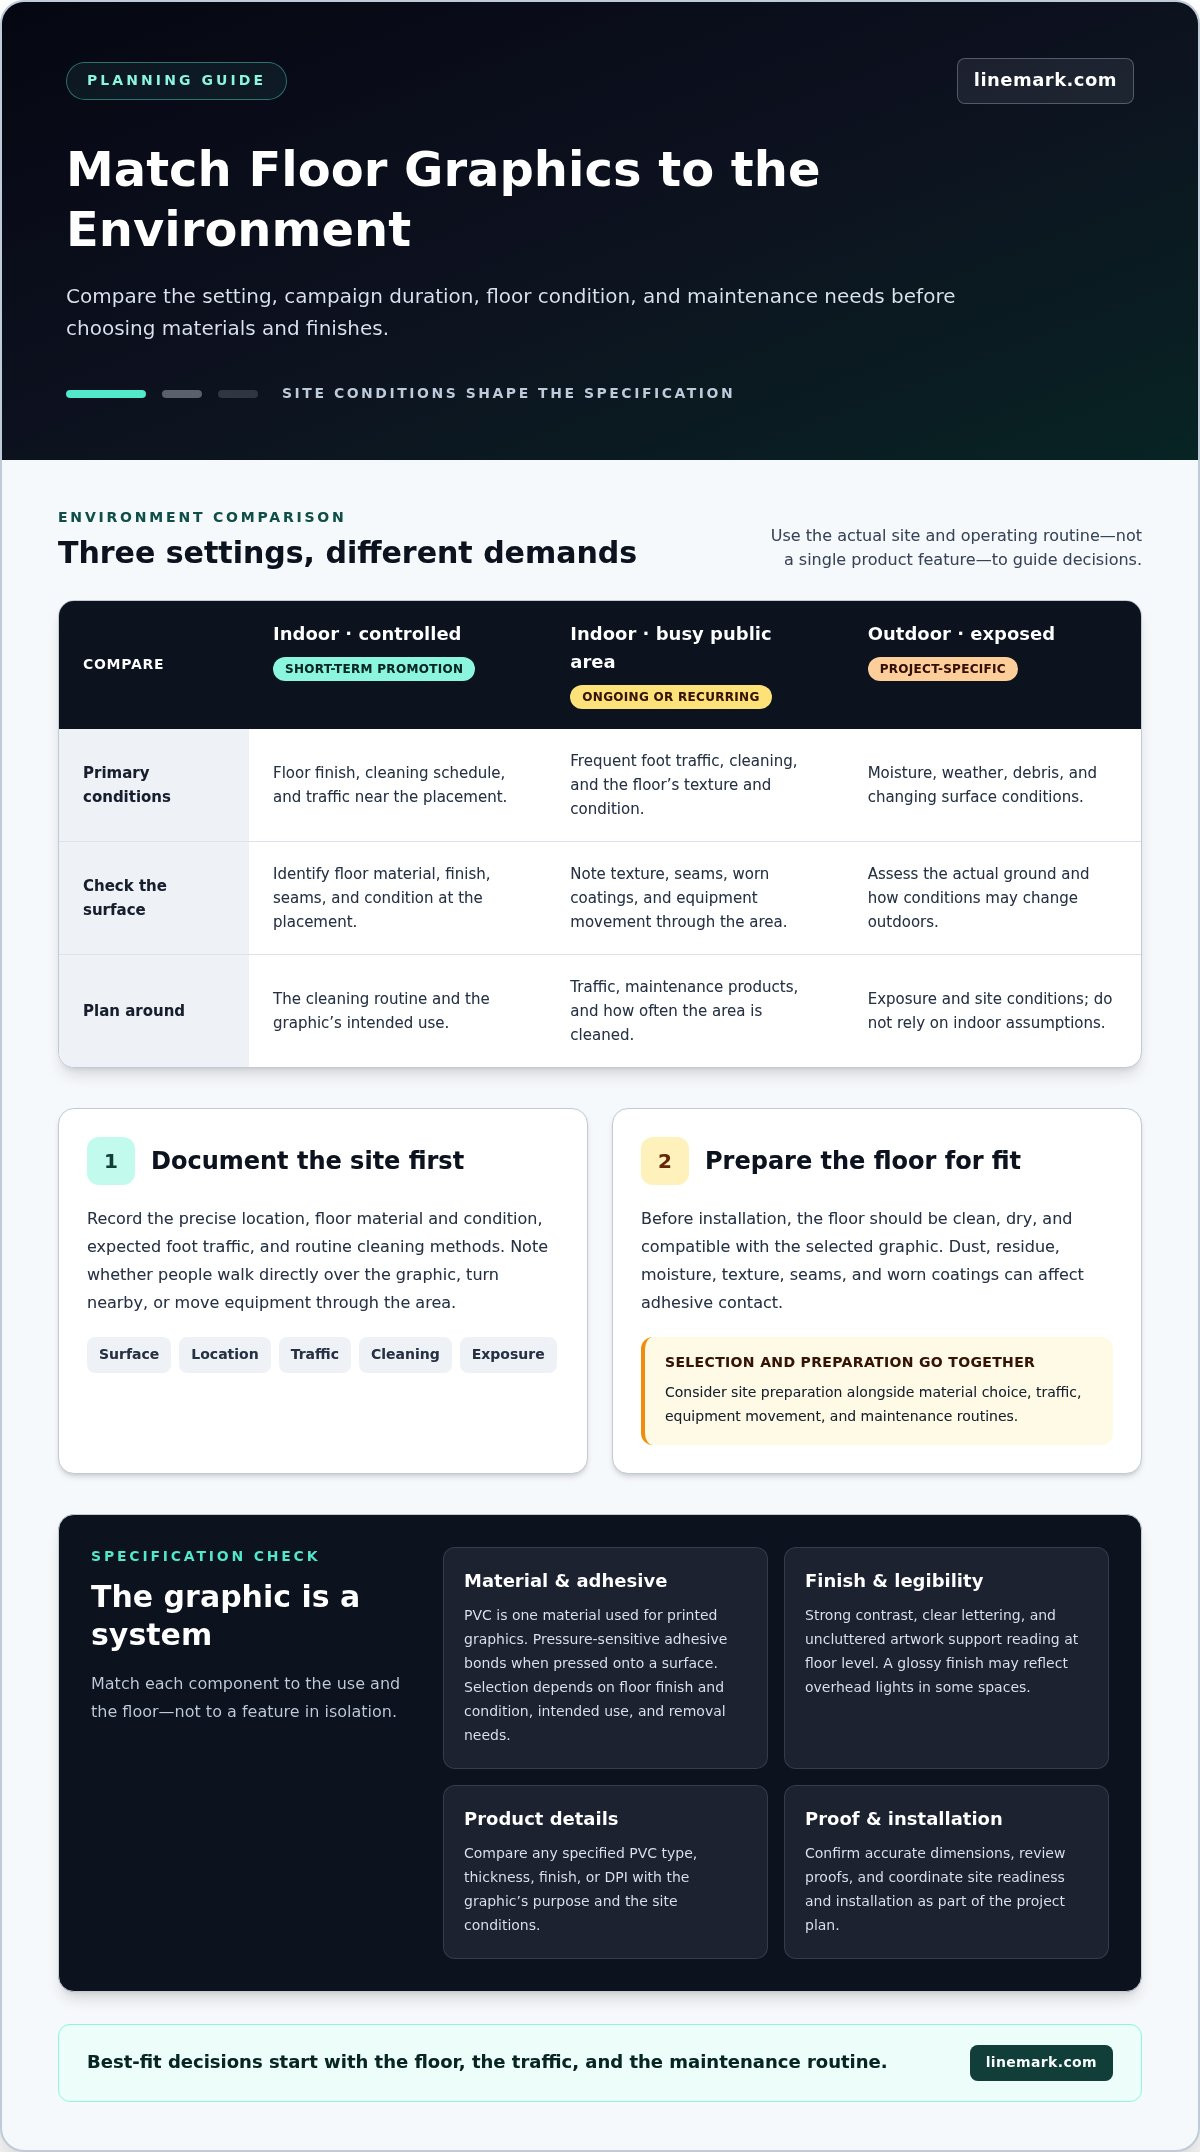
A floor graphic is a system: the printed face, substrate, adhesive, finish, and underlying surface all affect suitability. In custom floor graphics printing, a material that works in one location may not be right for another. Define the environment and campaign duration first, then match the specifications to the actual floor and maintenance routine.
How should teams compare material and finish options?
PVC is one material used for printed graphics. Pressure-sensitive adhesive describes adhesive that bonds when pressed onto a surface. These terms help explain how a graphic may be constructed, but they aren’t universal specifications or proof that a product suits every floor. Adhesive selection should account for the floor’s finish and condition, intended use, and removal needs.
A finish affects the graphic’s appearance and how easily people can read the message under the site’s lighting. Strong contrast, clear lettering, and uncluttered artwork support legibility at floor level. A glossy finish may reflect overhead lights in some spaces, while a less reflective appearance may work better for those viewing conditions. Choose based on the project rather than assuming one finish or print resolution is always best.
Product descriptions may specify a particular PVC type, thickness, finish, or DPI. Compare those specifications with the graphic’s purpose and site conditions instead of treating a single feature as proof of performance.
How do surface and maintenance conditions shape performance?
The floor should be clean, dry, and compatible with the selected graphic before installation. Dust, residue, moisture, texture, seams, and worn coatings can affect adhesive contact. Foot traffic and equipment movement add further demands, while cleaning products and routines can affect the graphic’s appearance and how it stays in place over time. Consider site preparation and product selection together.
| Environment | Campaign duration | Surface and maintenance considerations |
|---|---|---|
| Indoor, controlled area | Short-term promotion | Assess floor finish, cleaning schedule, and traffic near the placement. |
| Indoor, busy public area | Ongoing or recurring use | Account for frequent foot traffic, cleaning, and the surface’s texture and condition. |
| Outdoor or exposed location | Project-specific | Consider moisture, weather, debris, and changing surface conditions. |
Safety needs specific attention. Don’t describe a graphic as slip-resistant without a supporting specification for the chosen application and conditions. The printing-industry discussion of safety and liability standards underscores why teams should verify relevant slip-resistance information before placing graphics where people will walk. Linemark produces floor graphics as part of its large-format services, with project planning informed by the surface and installation requirements.
How Should You Compare Custom Floor Graphics Printing Options?
Compare options by how well they serve the project, not by the number of features in a product menu. Start with the communication objective, then weigh the location, floor conditions, artwork, quantity, and installation plan together. A bold shape or intricate finish won’t help if the message is hard to read or the graphic doesn’t fit the space.
Use this decision guide to connect common project types with the questions that should shape specifications:
- Wayfinding in one facility: Define the decision points where visitors need help, their viewing distance, and expected traffic. Prioritize concise copy, clear directional cues, and dimensions that fit the walking route.
- Retail promotion across multiple locations: Align the offer, colors, and artwork across placements. Confirm floor conditions at each site, plan repeat quantities, and coordinate installation requirements so the campaign is consistent without assuming every location is identical.
- Event or branded environment: Identify the areas the graphics should define or reinforce. Choose a scale and shape that suit the space, and coordinate quantities and installation timing with the event plan.
Which specifications matter most for your project?
Separate essential requirements from visual preferences. Essential details often include the intended message, placement, dimensions, floor conditions, quantity, and installation constraints. Optional choices, such as a distinctive contour or decorative finish, should strengthen the communication rather than compete with it.
Scale affects readability and placement. A directional cue needs to be visible where people make a route choice, while a larger graphic may help establish a branded zone. Color should maintain contrast with the floor and support the campaign artwork. A custom-cut shape can draw attention, but it shouldn’t obscure copy or make the graphic harder to understand at a glance. For a broader view of how floor graphics fit into a coordinated visual program, explore Linemark’s large format graphics guide.
When does campaign coordination matter as much as the graphic?
Coordination matters when the floor graphic is one piece of a larger campaign or appears repeatedly. Use consistent artwork, color choices, and message hierarchy across floor graphics and related materials, while adapting dimensions and placement to each space. This helps the audience recognize the campaign without forcing every format into the same layout.
For repeat orders, document approved artwork, dimensions, quantities by location, and installation requirements in a shared project plan. That gives marketing and operations teams a common reference and helps production align each piece with its intended use. Custom floor graphics printing works best when project decisions are treated as a connected set of specifications, not isolated design preferences.
How Do You Prepare Artwork and Plan Floor Graphics Installation?
A reliable floor-graphics project moves through a defined sequence: establish the brief, prepare and review artwork, approve a proof, ready the site, then coordinate installation and care. Aligning these steps early helps marketing, facilities, and production teams work from the same plan. File requirements depend on the final specifications, including dimensions and production needs.
What should the artwork and production brief include?
Start with one production brief that captures the details everyone needs to execute consistently:
- Purpose and placement: State the message, audience action, exact location, and how the graphic relates to nearby signs or displays.
- Dimensions and quantity: Record the finished size, number of graphics, and any differences between placements or locations.
- Artwork direction: Specify approved colors, logos, copy hierarchy, and any required brand assets.
- File preparation: Confirm the delivery format and production requirements for the approved dimensions.
Artwork should account for bleed and safe areas. Bleed is extra image or color beyond the trim edge, helping prevent an unintended unprinted border after cutting. A safe area keeps essential text and logos far enough inside the edge that they aren’t clipped. Vector graphics, made from paths rather than fixed pixels, can be resized cleanly and are often useful for logos and simple shapes. Prepare files to the project’s production specifications.
Review a proof before production. Check the wording, colors, finished dimensions, cut shape, and placement. Consider the proof at the intended viewing scale, not just enlarged on a screen. Confirm that the message remains legible and important elements aren’t too close to an edge or hidden by the planned location.
How can teams prepare the site for installation?
Once artwork is approved, coordinate the site in sequence. Identify the installation location and surface condition, arrange access, and schedule the work with the people responsible for the space. Plan floor cleaning according to the material and installation requirements, and ensure the surface is ready before work begins. Resolve stakeholder approvals in advance to avoid last-minute placement changes.
Linemark’s large-format services include professional on-site installation. Coordinate the installation plan around the project’s requirements and the conditions at each site. Before the graphic goes into use, align facilities and marketing teams on care guidance for the selected material, including suitable cleaning practices and relevant maintenance instructions.
For a coordinated path from production planning to on-site execution, plan your floor graphics project with Linemark.
How Can Linemark Support Custom Floor Graphics at Business Scale?
Business floor-graphics projects often involve more than printing a single graphic. Artwork, site conditions, quantities, schedules, and installation planning all need to align. Linemark produces floor graphics as part of its large-format graphics offering and provides professional on-site installation, connecting production with project execution.
This coordinated approach helps marketing and operations teams work from shared project requirements. For example, a campaign with graphics for several placements needs clear specifications for each location, consistent approved artwork, and installation planning that reflects the conditions at those sites. Linemark supports the production process with project-specific planning, rather than treating custom floor graphics printing as a stand-alone online configuration.
What does a coordinated production partner contribute?
Early alignment surfaces practical questions before production: Are the dimensions and quantities clear? Does the artwork match the intended placement? Which site conditions may affect the project plan? How should production and installation be coordinated? Resolving these details together gives teams a more organized path from approved materials to on-site execution.
Linemark brings more than 30 years of experience in print projects and operates a 90,000-square-foot production facility. Alongside large-format production, professional on-site installation supports a connected approach to planning and execution.
Floor graphics can also complement other large-format communications, such as banners, signage, wall murals, or window graphics. Coordinating those elements helps a campaign carry a consistent message across different surfaces while allowing each format to serve its distinct role.
What are the next steps for a floor-graphics project?
A focused project brief helps teams move from campaign goals to production decisions. Prepare the information that defines the work:
- Campaign goal and placement: What should the graphic communicate, and where will people encounter it?
- Dimensions and quantity: What finished sizes and counts are needed for each placement?
- Artwork: Which files, brand assets, and approved messages will guide production?
- Site and timing needs: What floor conditions, access considerations, and installation timing should shape coordination?
A tailored plan should define how artwork and specifications will be reviewed, how quantities relate to placements, and how production aligns with installation and site readiness. Shape the details around the project rather than relying on assumptions. For a coordinated production approach, discuss your floor graphics project with Linemark.
Plan Floor Graphics That Work for Your Space
Effective custom floor graphics printing starts with the setting and the job the graphic needs to do. Match materials and finishes to the floor, traffic, and maintenance conditions, then align dimensions, artwork, quantity, and installation plans before production. This coordination keeps campaign goals and on-site realities in view from the first brief through installation.
Linemark brings more than 30 years of experience to large-format projects and operates a 90,000-square-foot production facility. Its offerings include large-format graphics, floor graphics, and professional on-site installation, supporting a connected approach to production and project execution.
Have a campaign or operational need to plan? Discuss your custom floor graphics project with Linemark and take the next step toward specifications tailored to your space and goals.
Frequently Asked Questions
What are custom floor graphics used for?
Custom floor graphics help businesses communicate where people move through a space. They can direct visitors toward an entrance or service area, highlight a retail promotion near a display, reinforce event branding, or share operational cues such as where to queue. Start with the action you want people to take, then make the message and placement support that goal clearly.
What material is best for custom floor graphics?
The best material depends on the floor, location, campaign duration, traffic, and maintenance routine. A graphic intended for a controlled indoor promotion may have different requirements from one placed in a busy public area or outdoors. Consider substrate, adhesive, and finish together, and specify them for the intended application. Don’t assume that a material or construction used in one project suits every floor.
Can floor graphics be applied to any floor surface?
No. Surface texture, finish, seams, wear, moisture, and cleaning residue can affect whether a graphic is suitable and how it performs. Identify the exact floor material and condition where the graphic will be placed, then match the specifications to that surface. A clean, dry, compatible floor is an important starting point, but it doesn’t make every graphic appropriate for every surface.
Are custom floor graphics safe for high-traffic areas?
They can be considered for high-traffic areas only when the graphic’s documented specifications suit the application. Verify slip-resistance information for the selected material and intended conditions, particularly where people may walk over it or where moisture is present. Also account for traffic patterns, cleaning, and the floor itself. Don’t infer safety from appearance or a general product description. Review the applicable documentation.
How do you install custom floor graphics without bubbles?
Begin with a floor prepared according to the graphic’s installation instructions, typically clean, dry, and free of residue. Align the graphic before bonding it, then apply it gradually and smooth it from the center toward the edges with a suitable application tool. Avoid stretching it or trapping debris beneath it. Exact procedures depend on the material and site, so follow the project-specific installation guidance.
How long do printed floor graphics last?
There’s no single lifespan that applies to every printed floor graphic. Longevity depends on the material and finish, floor compatibility, traffic, exposure to moisture or outdoor conditions, and cleaning practices. A short-term campaign and a graphic intended for ongoing use may need different specifications. Set expectations around the actual environment and care routine, rather than relying on a general duration that may not fit your project.
Can floor graphics be made in custom shapes and sizes?
Yes. A project can be planned around the dimensions and shape needed for its placement and communication goal. Include the intended location, finished measurements, quantity, and shape requirements in the production brief. Keep key copy and logos clear of trim edges, and make sure the outline works with the floor layout. Final specifications should reflect the site and production requirements.
How should a business prepare artwork for floor graphics printing?
Provide the final dimensions, placement, approved copy, colors, logos, and quantity. Prepare files to the project’s specifications, including any required bleed, which extends artwork past the trim edge, and safe areas that keep important content away from it. Vector artwork can help preserve clean edges for logos and shapes. Review a proof for scale, legibility, color, and placement before production begins.